The Broadcast Pix ChurchPix system is a turnkey live production solution designed for volunteer operators with dedicated content and easy-to-use controls. From starting up the system to streaming services live to Facebook, here are some helpful tricks and tips on ChurchPix – the complete video production and streaming solution designed for churches.
1. Getting Started
Once turned on, the system boots into an easy-to-navigate screen:
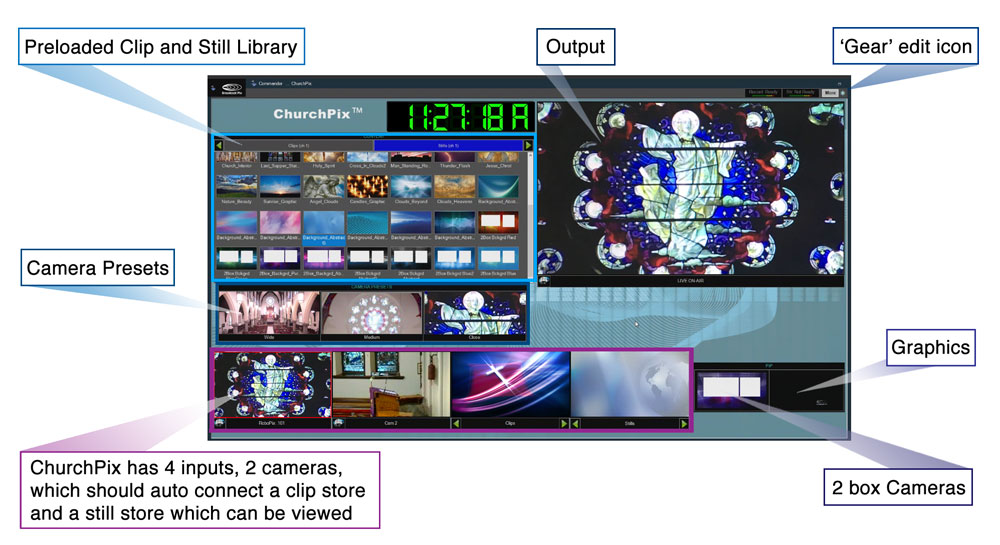
The cameras can be moved by clicking on each camera thumbnail and using the on-screen motion controls. Presets can also be set in this window by clicking on the bottom right button, moving the camera and then saving that position. There are three camera presets for each camera: a wide, medium and close shot – these of course can be easily adjusted.
Clicking on the thumbnail in the library will load that media into the clip or still window.
2. Set up your audio
Make sure your audio is connected through the audio mini jack, or an external USB device. This would usually be a feed from the audio mixer in your church. Click on the VU meters on the top right and select the set-up button, which selects any source seen by the Windows OS. Once connected, there are sliders to control the volume coming in as well as the volume of any clips.
3. Navigation philosophy
First, click on the window in which you want to change something, click on the top right ‘gear’ icon, then the edit tab – this provides full access to all the editable parameters in that window.
4. Add your Churches’ logo or graphic
Graphics can be added to your output by clicking on the bottom right graphics logo thumbnail button. Currently defaulted to the Broadcast Pix logo, you can easily replace this with your logo through the ‘gear’ icon, edit, then select your logo from anywhere on the PC.
Next to the graphic button is a picture-in-picture button, which uses the two cameras over a preselected background still. This can also be easily changed through the gear and edit button.
The logo can also be changed to someone’s name, such as the Organist, or the Priest, by a similar process.
5. Adding your own content
Your own content can be added through watch folders on the desktop. Drop content into the clip folder and it will be automatically added to the system and appear in the library, for use immediately.
6. Recording and streaming
Minimizing the screen, using the top right button, reveals the recording and streaming button. The destinations for the recording and streaming is chosen through a simple menu system. Facebook is already preloaded; just add your credentials to log in.
To start and stop recording or streaming click on the ‘more’ button to reveal the control.
7. Customizing using Macros
Through the ‘gear’ icon and edit menu, you can add and edit macro’s that record and test any functionality needed, including linking them to relevant media, so a specific clip or still is recalled. This also includes adding buttons and changing the user interface. As you get more experienced with the system, you can start dramatically improving your production values by simplifying repetitive tasks and building macros that increase your show’s production values.
8. Our favorite Macro
Add a single button to the UI that zooms out the on-air camera, transitions to a still image that has been added, such as a picture of your stained glass window, then transitions to the second camera that is focused on the organist, putting up a graphic with the hymn title as it does so, after a short time, then transition back to the first camera that is now looking at the congregation singing, having repositioned itself in the background.
For further training and customization, please contact us directly here.